Blackboard: Building and Setting Up Tests and Exams
- 06 Feb 2023
- 11 Minutes to read
- Contributors

- Print
- DarkLight
- PDF
Blackboard: Building and Setting Up Tests and Exams
- Updated on 06 Feb 2023
- 11 Minutes to read
- Contributors
- Print
- DarkLight
- PDF
Article summary
Did you find this summary helpful?
Thank you for your feedback
Whether you are creating a weekly quiz, a chapter test or a final exam, if you plan to use Blackboard for students to answer the questions, you will be using the Test Tool.
If you prefer to upload a Word Doc or PDF file with the test or exam questions and want the students to provide their answers back in the same format, you will use the Assignment Tool (see the bottom of this article for more information about that).
Creating a Test, Quiz, or Exam
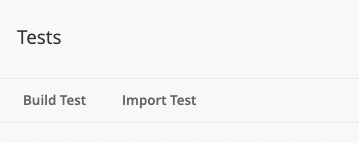
To create a new test, scroll down on your left-hand navigation bar until you find Course Tools. Under that tab, click on “Test, Surveys, and Pools” and then “Tests”.


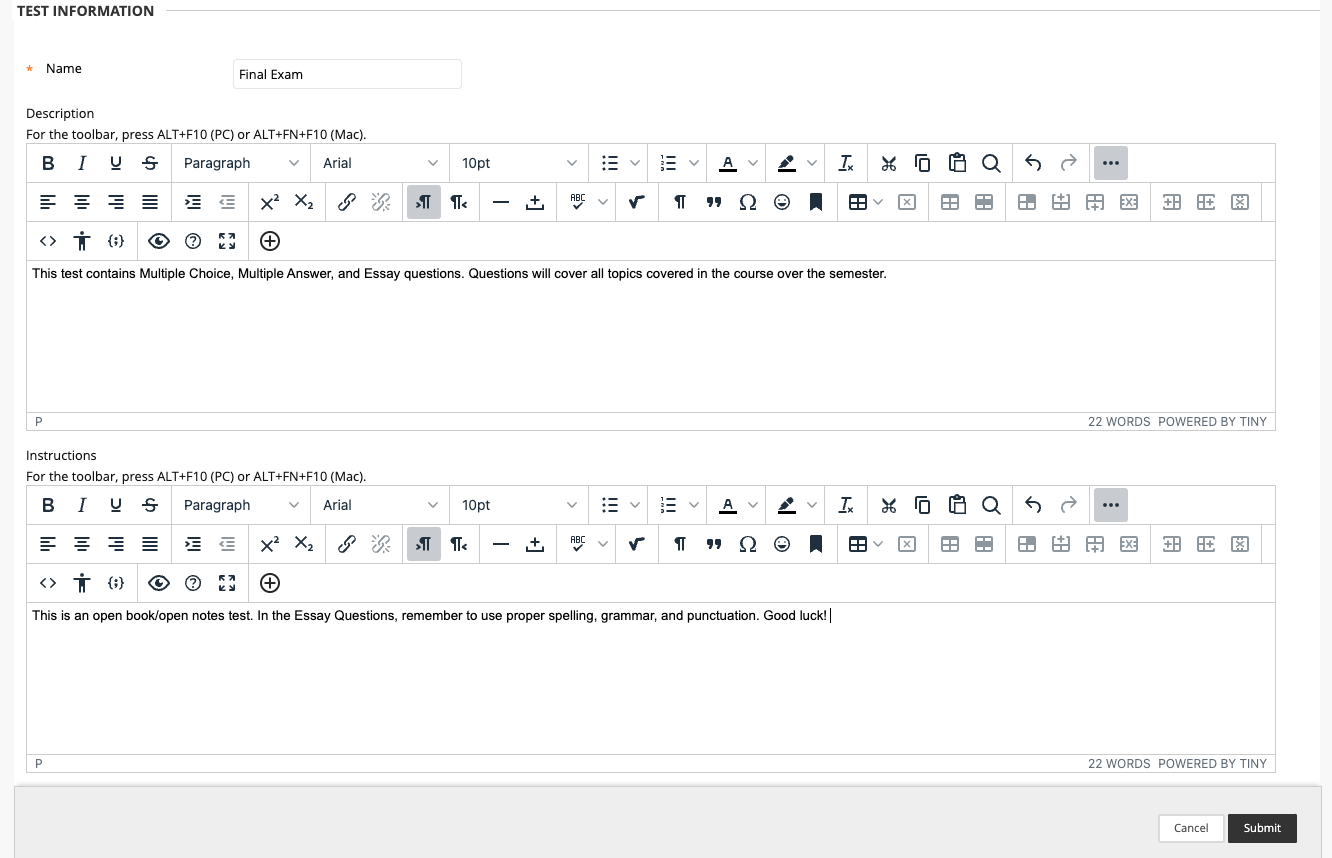
For a brand new test that you will create click “Build Test”. There is also an “Import Test” option, which will be explained later in this article. Give the test a name (i.e. Final Exam, Module 4 Test, etc.). If you choose to, you can also provide additional instructions, a good luck message, or a description on this page. The test will automatically display the basic instructions for a test before a student takes one. Things like timing, auto submit, due date, will all be included for the tests. These spaces are not places to put a due date as you will have to keep changing it each semester. The best use of these spaces for statements like “This is an open book test.”, “Good luck! You got this!”, “You will be graded on grammar, creativity, and overall understanding of the concepts in this chapter.”
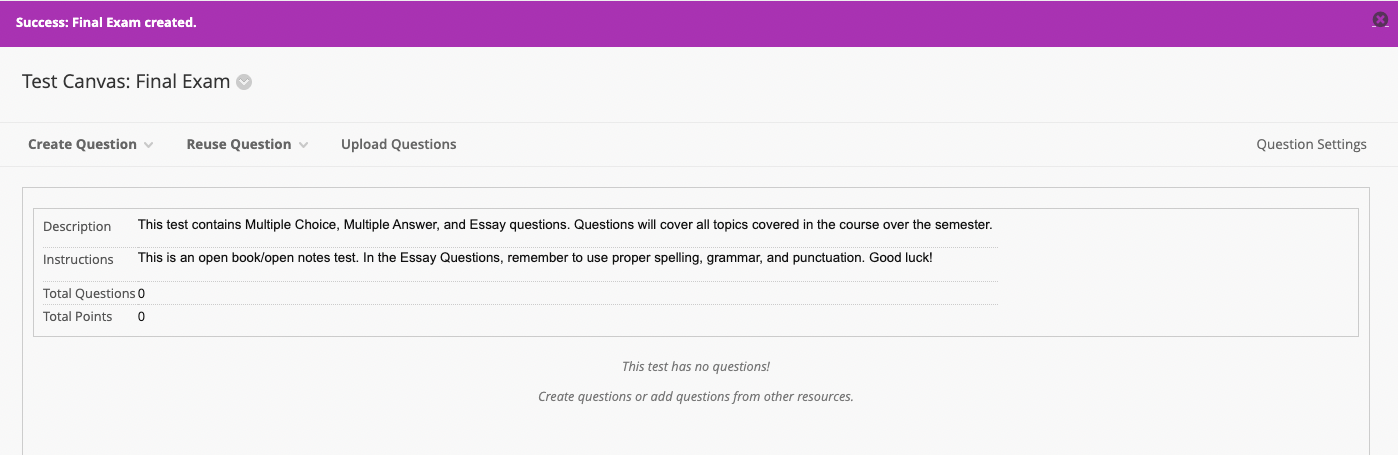 Adding Questions to the Test


 Adding Questions to the Test
If this is a new test, use the “Create Question” drop down to start. A variety of question types will appear. Select the best choice for your first question. Once you have a created a question, you have the option to “Submit” or “Submit and Create Another”. If you choose “Submit and Create Another”, it will bring up another template for the same question type. If you need to change the question type or are finished entering questions, choose “Submit”.


If you want to reuse questions that are in other tests and quizzes, hover over the “Reuse Question” option. Click on “Find Questions”, select “Copy Selected Questions” (this prevents broken links later) and it will bring you to your question sets. Select “Pools” or “Tests” (depending on how your previous questions were built into the course) then choose a pool or test by checking it off. Then you will select all or some of those questions presented on the right. This can be repeated with different pools and tests until you have all the questions you want copied into the Test. Note: if you have a pool or test with more than 200 questions, the system will only let you transfer 200 at a time.


 You can also create “Random Blocks” in the test. Let’s say for example you want to grab questions from each of the weekly quizzes you’ve made throughout the course, but you only want students to answer 3 questions from each of those in this test, you will use this option. Click on the first pool or test you want to use and choose which type of questions you'd like to use or select “All Pool Questions” and click “Submit.” The Random Block will appear in your Test. Here, you will input the number of questions you want Blackboard to choose at random for each student within that block. The points per question will be for each of questions that are answered within the block. If you have 3 questions and choose 10 points, the block will be worth 30 points overall.


Another way to create questions is to bring in a test from another course section. For example, maybe you have several sections of your course (which are not merged) and you create the test in one of them, but you want the same test in all sections. In the course with the test, go to your "Tests" page in "Tests, Surveys, and Pools", find the test you want, and click on the down arrow next to the test name. From here, select “Export to Local Computer”. Then go to the course you'd like to add these questions. In the area for adding questions in a new test (as mentioned above), click “Import Test” and choose “Browse Local Files” . Select the file from your computer when the Finder pops up and click “Submit”.


Question Point Values
As each question is added to the test, the point value will automatically be put in as 10 points, by default. One way is to manually change each individual question manually. On the right hand side of the question or "Random Block", there is a "Points per question" block. Click on the 10 in the box. Then erase 10 and enter the number of your choice and click "Submit" as was mentioned earlier in the "Random Block" segment of this article. A question can also be scored as "Extra Credit".


You can also choose to change the point values of questions in groups or give all of the questions the same point values, without having to change the points one at a time.
At the top of the list of questions, you can choose "All" next to "Select". This will highlight all of the questions. If you only want certain ones to change, choose the group you'd like to change. Then type in the point value you'd like to use next to "Points" and click "Update". To change other point value groups, repeat this process.

Sometimes, you might need to change point values for a question or questions after the test has already been taken by at least one student. You will change the point value as you have before but this time click "Submit and Regrade." It will recalculate the scores of the students who have already taken the test.

Placing the Test Within Your Course
Once you have created the questions for the test, the students won’t be able to see or take the test until you have put the test in an area they have access to.
On the Home Page, or any content folder you’d like to add the test to, click on the "Assessments" drop down and click on “Test”. From the list next to “Add an Existing Test”, choose the test you want and hit "Submit". Choose your desired options and click “Submit”.
Once this has happened, it will automatically add the grading column for this item to the Grade Book.
.png)

Editing Test Options
If you’d like to change or update the test options, hover over the test link, click on the down arrow and click on “Edit the Test Options.”

The first option is to rename the test entirely or correct a typo. You can then update the description of the test. Below the description box, it will display the "Test Description" and "Test Instructions" and you have the option to display each before the test is begun. If you’d like your statements to be shown, be sure to check off the boxes. You may choose to uncheck the boxes, or not have anything in the description and instruction boxes. If you opt to have the test open in a new window, a new tab will pop out for students. If you opt for no, it will change the page to the Test within the same window.

Under “Test Availability” select “Yes” to make it available to students (you can choose in another option to limit dates students can see it). If you decide to click “No”, you will have to go back in and change this later. If you’d like to allow more than one attempt of the test, click "Multiple Attempts" and then choose whether you’d like to allow them to have "Unlimited Attempts" (this is usually used for a low-stakes test that the instructor may want them to get all the answers correct as a way to student for an upcoming Exam) or choose "Number of Attempts" and enter the number. If you choose more than one attempt, you will then need to choose which score is used in the Grade Center.
We do not recommend using Force Completion. Leave that unchecked. If a student is accidentally kicked out of the test due to Wi-fi, low computer battery or they close the tab by mistake, they will not be able to get back into the test.
If you’d like to use a timer, set the timer for the desired number of minutes. Then decide if you want Auto-Submit on or off. If you set the timer, but leave Auto-Submit off, the students can stay in the test for as long as they want, even beyond the time limit. How much time they used will show up in their attempt. If you select on, it will give the students a warning when the time is almost up, then at the end of the time, it will save their answers and submit them regardless if they are finished or not.
To make the test to be available immediately, you do not need to use the "Display After" option. If you want it to have a limited amount of time that students can take it, you will enter the time and date that it opens and closes. You do not have to use both options. You can use one or the other if that suits your needs better.
A password can be entered if you wish. These are usually used in situations like if you are having the test in class and you want to prevent them from starting the test until you give all the instructions and then post the password for them to start or if you want to limit the test to certain students before or after the time when other students will be taking the test. Only the students who need it will receive the password from you. Note: If you do choose this option, be very careful about the password you enter. Any spaces at the beginning of the password or in between or at the end or any other characters will affect the students accessing the test.


Under "Test Availability Exceptions" you can choose to give a student another attempt, more time, or different dates to access to the test. This can be used if a student has accessibility accommodations or has an extenuating circumstance. You can also choose to give the Test only to a certain group. For example, maybe you have merged undergrad and grad sections together and you want the two groups to take different Final Exams. First, create groups with the students sorted as you need them in your "Groups" tab. In the "Test Options", click on "Add User or Group" and select the group you want to have access and click "Submit".
Select the due date and time for the exam by clicking the calendar and clock buttons. Once the due date has been set, it will add it to the students' "Calendar" in Blackboard. You may then choose if you want to allow anyone to take the test beyond the due date. If this remains unchecked, a student can take the test late. Do not choose this option if you have a student who has accommodations beyond the due date or if you expect a student may need to take it at another time. Even if you add the student under the "Test Availability Exceptions" with permission to take it beyond the due date, Blackboard will not allow them to access the test if this box is checked.

For show "Test Results and Feedback to Students", you can choose these things to be released to the students on a timer or immediately. Under the drop down, there is a variety of options from immediate to after a certain date. Use the options in the line after the drop down to select what information they are given. If you do not wish for them to see any answers or feedback until you release the column in the Grade Center, keep both drop downs at “---Choose---“.
The final option is "Test Presentation". Here you can choose to have all the questions presented at once, all on the same screen or for the test to only display one question at a time. You must choose one or the other. If you choose one at a time, you can also prohibit backtracking. If you want students to be able to jump around to the questions or skip a question to go back to, do not check this box. If you want the students to answer the questions in the order presented and they cannot go back to change an answer, you will check this box. Finally, choose if the questions are randomized or not. If you leave the box unchecked, the test will show in the exact order they are input into the test.

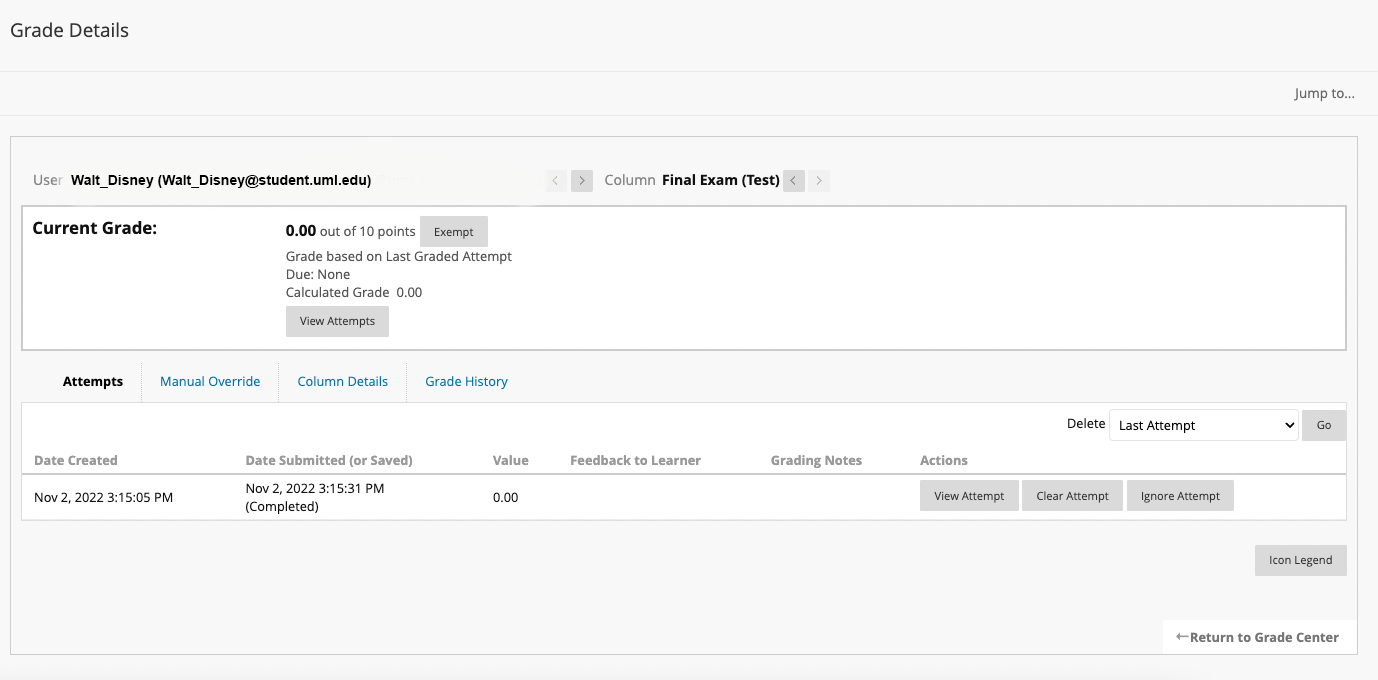
Ignoring an Attempt
There are a variety of reasons why you might want to "Ignore an Attempt" for a student. The attempt will still be kept if you choose this option. It is not recommended that you use "Clear Attempt" because it will delete the attempt all together.
In the Grade Center, click on the arrow next to the grade you’d like to ignore and click "View Grade Details". On the bottom right of the next screen you can select the "Ignore Attempt" button. This can be undone by clicking on the "Do Not Ignore Attempt" button that will then appear.


Using the Assignment Tool to Create a Test

Adding the question types that are offered in Blackboard, may not fit your needs. If uploading a PDF or Word Doc is a better option for you, and you’d like the students to also submit a PDF or Word Doc for their attempt, upload the test using the Assignment Tool and proceed how you would if you were creating an assignment, but be sure to name it with your exam name. (Note: It does say "Assignment Information" when a student clicks on the link. However, as long as you label it as a test or exam, they will know that's what it is. This is a frequently used way to put in a Test.)

Was this article helpful?