Blackboard: Adding Items, Links, Files, Embedded Items, Images, and YouTube Videos
- 06 Feb 2023
- 4 Minutes to read
- Contributors

- Print
- DarkLight
- PDF
Blackboard: Adding Items, Links, Files, Embedded Items, Images, and YouTube Videos
- Updated on 06 Feb 2023
- 4 Minutes to read
- Contributors
- Print
- DarkLight
- PDF
Article summary
Did you find this summary helpful?
Thank you for your feedback
Note: Please use the table of contents on the right-hand side to advance to the information you need.
Adding Items
An item can be a variety of different things from a file to text.
Go to the page where you would like to add the item and click "Build Content" and then "Item".

Add a name for your item and leave the color black for accessibility reasons. Then, write any instructions or course content you'd like to add in the "Text" box. Scrolling down further, you will also see the option to upload a file. (This is different from the add file option.) Once you've completed everything you need to add, click "Submit".

This is what an "Item" looks like when added to the course. The top example includes a file and instructions. The bottom example shows only text.

Adding Links
It is highly recommended to use this option to insert links instead of the "Item" option for accessibility reasons. Simply copying and pasting links into a text box is not ADA-compliant.
First, find the link that you would like to post for students and copy the link. Different sites may present this differently. You may need to copy it or click a button or hit share first.
 Second, go back to Blackboard and click "Build Content" then "Web Link".

Third, insert the link into the "URL" box and name the link what it is. Do not post the link in both boxes. If you wish, you may also provide context for what the link is, personal story, instructions, etc in the "Text" box. It is recommended that external links always be set to "Yes" under the option to "Open in a New Window". Then, click "Submit."

.png)
This is what a link will look like once added to the course (no additional text was added.)

Adding Files
To add a "File" to your course, click on "Build Content" and then "File".

On the "Create File" page, name your file and then attach the file using "Browse Local Files" or "Browse Content Collection". You may leave the other options as is or change them and click "Submit". There is no text box option with this upload type.

This is what it looks like in Blackboard when you add a "File". Notice that it is different than when you add a file using the "Item" option as shown above.

Adding Images
To add an "Image" to your course, click on "Build Content" and then "Image".

On the "Create Image" page, name your image. You may want to add context in the "Long Description" box so students know what they are looking at or provide instructions. Set your preferred options and then click "Submit".
.png) It is really important to keep accessibility in mind at all times when building your course. Although you may think "I don't have anyone this semester who has a disability", that might not necessarily be true. Some students may not disclose that they use a screen reader, need captions, or are color blind. You may also have a student in a future semester who may need it.
It is really important to keep accessibility in mind at all times when building your course. Although you may think "I don't have anyone this semester who has a disability", that might not necessarily be true. Some students may not disclose that they use a screen reader, need captions, or are color blind. You may also have a student in a future semester who may need it.
When adding an image, it is very important that you add a short but detailed description in the "Alt Text" box. If a student is using a screen reader, the reader will read to them what is it in that box. Even if the image is decorative, you may want to add "a decorative image of flowers" for example so the student knows it is not important for learning the course content and can move on from it. The "IT Tip" image in this document had an alt text which says "IT Tip".


This is what an image will look like once added to your course. This example has a border thickness of 2.

Adding Embedded Items
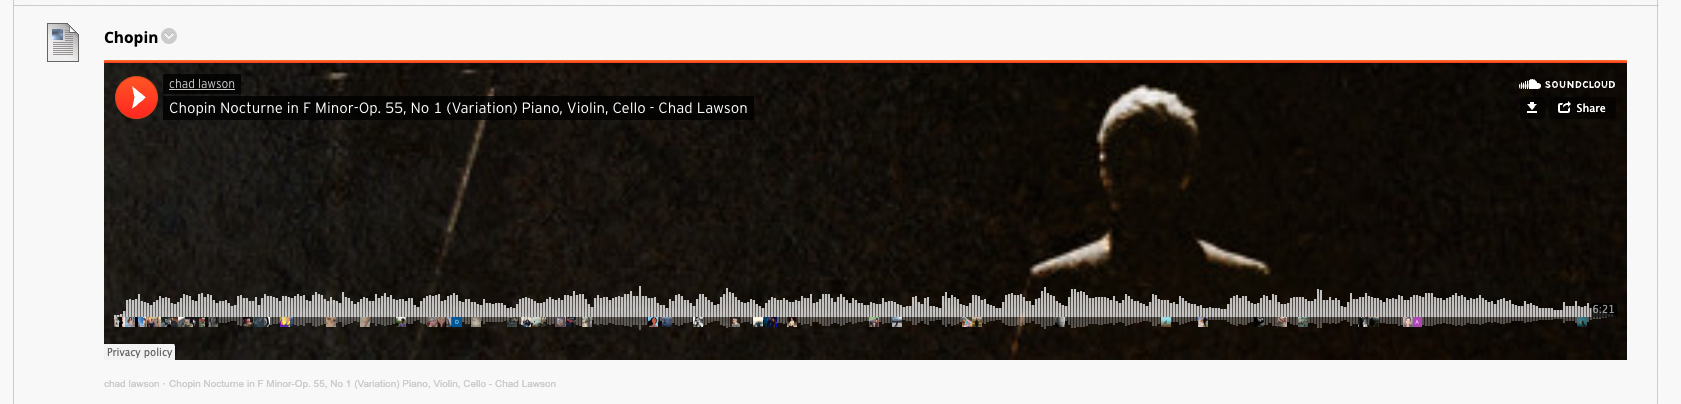
Adding an "Embedded Item" into your course can be a little complicated the first time you do it but is very easy once you get the hang of it. The item also looks really nice when embedded directly into Blackboard. Students can watch or listen or interact with the embedded item directly in Blackboard without having to go to an outside page.
Find the item you would like to embed and copy the embed code. This is a long link that usually has "iframe" at the beginning. To get the embed code for this example, I had to click on "Share" and then switch the top tab to "Embed".


Back in Blackboard, click on "Build Content" and then "Item".
.png)
When the "Create Item" screen opens, name your item and then click on the "<>" sign (this a universal sign indicating code is used and you may find that items simply have a button with this on it to indicate it contains the embed code).

A "Source code" text box will pop up. Paste the link that you copied into this box and click "Save".

This is what an embedded video may look like in your course and it will play right from here. The videos will also have all the function options they would have on their original site.
 Adding YouTube Videos

In Blackboard, there is a "YouTube Mashup" option which helps you find a video to post right from Blackboard. YouTube videos can also be embedded as shown above. Click on "Build Content" and then click "YouTube Video".

Here, you can search for the video you'd like to post. Once you've found it, click "Select" below the video thumbnail.

On the "Create Mashup Item" screen, you can change different settings which will affect the look of your video once posted. You can rename the video, add context, change the view of the video, and add the option to have the link to YouTube posted with the video. Once you have set all your preferred options, click "Submit".


This is one example of how a YouTube video may look in Blackboard depending on your selected options.

Was this article helpful?